Building an 64-bit operating system using dockers, vscode and qemue.
This blog was actually an assignment given by our cow professor Dr Muhammad Imran Abeel.
Build Your Own 64-bit Operating System
Today i will show you how you can build your own 64-bit Operating System. But before the start of this tutorial you should have some basic knowldge of computer programming laguages. You should have the knowldge about the assembly language.
Here you can find the repo for the code https://github.com/imranzaheer612/Building-64-bit-Kernal.
Setting up the enviroment
Text Editor
You should have any text editor for writting and editting the code. For this tutorial i am using the vs Code. You can download it from the there website.
vscode
Docker
Install docker from the website. But you shlould have WSL 2 backend. As mentioned in there prequisites tab. Don’t forget to set the path for the docker.

docker
Setting up WSL 2
Follow the following steps or can refer to this page. Also visit the microsoft docs.
Open the power shell as admin and run this command
dism.exe /online /enable-feature /featurename:Microsoft-Windows-Subsystem-Linux /all /norestart
Open the power shell as admin and run this command
dism.exe /online /enable-feature /featurename:VirtualMachinePlatform /all /norestart
The next part takes only a couple of steps.
Download the WSL2 Kernel update.
Run the installer.
When prompted for elevated permissions, click yes.
wsl --set-default-version 2
Once the installer has done its thing, you’ll now have WSL2 successfully installed on your PC.
Qemu
Qemu is actually a virtual machine. You can download it from here.
Steps
- Download Qemu and .iso
- Add Qemu path to environment variables settings
- Create an image
- Starting the VM
- Some problems you might encounter
In order to setup the qemu enviroment you can consider this link. You can skip the last step (installing ubuntu on qemu because we will make aour own OS 😃).

qemu
Building OS
You will learn how to make a simple 32-bit OS using docker, vscode and qemu. I have attached an detailed vedio from youtube channel. You can consider the attached vedios for detailed explanation.
Building a simpple 32-bit OS.
Converting it to 64-bit OS using the Protected Mode Addressing.
Imp Building Commands
1. Make an Image
In this first vedio we will setup the Docker enviroment by making and docker image using the command.
docker build buildenv -t myos-buildenv
2. Run the image
After coding your OS you need to run the image by entering the buld enviroment.
Enter build environment:
- Linux or MacOS:
docker run --rm -it -v "$pwd":/root/env myos-buildenv
- Windows (CMD):
docker run --rm -it -v "%cd%":/root/env myos-buildenv
- Windows (PowerShell):
docker run --rm -it -v "${pwd}:/root/env" myos-buildenv
* NOTE: If you are having trouble with an unshared drive, ensure your docker daemon has access to the drive you’re development environment is in. For Docker Desktop, this is in “Settings > Shared Drives” or “Settings > Resources > File Sharing”.
3. Build
Enter this build command.Build for x86 (other architectures may come in the future):
make build-x86_64
To leave the build environment, enter “exit”.
4. Emulate
After building the basic OS you can emulate the operating system using Qemu: (Don’t forget to add qemu to your path!)
- Use the follwing command to emulate the OS.
qemu-system-x86_64 -cdrom dist/x86_64/kernel.iso
- NOTE: When building your operating system, if changes to your code fail to compile, ensure your QEMU emulator has been closed, as this will block writing to kernel.iso.
Alternatively, you should be able to load the operating system on a USB drive and boot into it when you turn on your computer. (I haven’t actually tested this yet.)
Build 32-bit OS
We will make the 32-bit OS based on the concept of the Real Mode Addressing. So thats why it will be easier to implement and later we can extend it to a 64-bit OS.
Real Mode Addressing
We will make a simple print Funtion in c that will print some text on to the screen. So, this will be just an intro about building a basic 32-bit OS. In the next section we will discuss how to convert it to 64-bit OS using the idea of protected mode addressing.
Converting to 64-bit
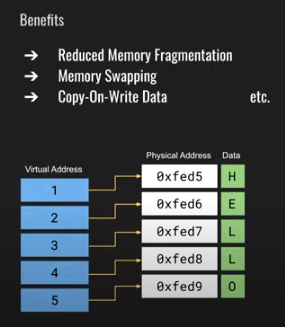
As you can see we successfully build our 3-bit OS in the above section. Now we are ready to change it to a 64-bit OS. The 64-bit will be diff from the 32-bit one this is because we have used the Real Mode Addressong. Now we will use the Protected Mode Addressing. As you know we don’t use the physical address of the memory in case of the protected mode but we uses the concept of Virtual Memory. We have to build the
- Discriptor Tables
- Gloabl Discriptor Tables
- Page Tables

Protected Mode
We will be using the multi level pagging. You can know more about the multi level paging multi level pagin.
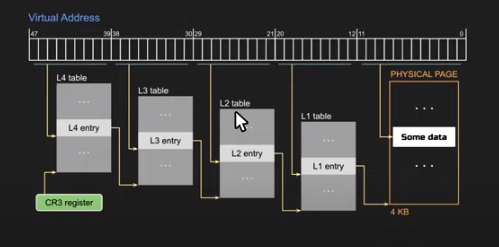
Multi Level Paging
We will also use the C code to make some print funtion to print strings and chars to the screeen.
Output
We will use the Qemu to emulate our 64-bit OS. As we run our kernal.iso file through the qemu we will see the output strings we printed using the C code.
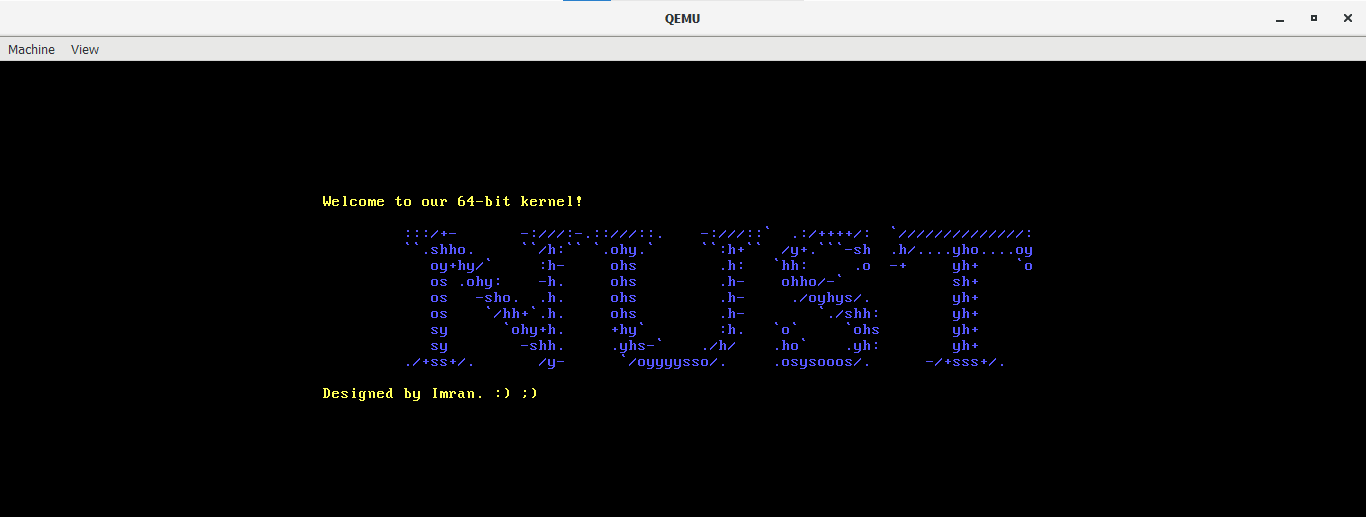
Output
You can see i printed NUST log using the print_str() funtion we built using C. And here you go you have created your own 64-bit Kernel! Sounds cool aha?
Are you curious how i printed this styled text?🤔 You can make your own using this image converter.
Hope it will be helpful.
Комментарии